Sunday, September 4, 2011

African Flower Blanket

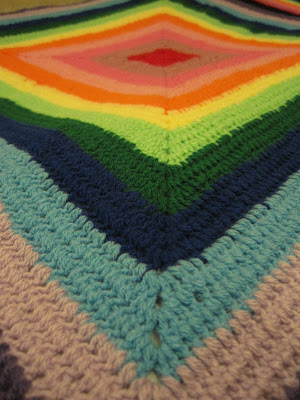
Hello ! My, my how time has simply flown by and I have not updated my blog. How tardy of me. Well, I have been a busy little bumbler. I have finished what I can only describe as a blanket of epic proportions. This is MY blanket, that's right, it is all mine, mine, mine ! But of course I am sharing this with you lovely, lovely people. It was a real pleasure making this blanket. I will get to the tutorial soon but for now here is the finished piece.


I do hope you like my blanket. I started this blanket on the 24th of March 2011 and finished on the 3rd August 2011. I have joined 188 flowers. I used regular DK yarn in an array of colours. I hope to blog again and explain the process and work that went in to this blanket.
This has been my biggest crochet project to date. I thank you all for taking the time to read about my crochet adventure. x


Friday, April 29, 2011

Baby Blanket


I made this baby blanket for my sister in law who had a baby girl this March. This is a classic granny square continued for 22 rounds. I used this wool from Peachey Ethnits. Tiny Tots 50g wool. 5 balls in total-250g, Colour 948 Candy. I was not sure if she was going to have a boy or a girl so I chose this shade as it had blue, pink yellow and green in the wool. You can see it in the picture above.

 
I used DK Bonus wool for the border. I used the colours that featured in the wool. I Double Crocheted all around the border. A row in mint green and a row in yellow. The pink border was crocheted in a picot stitch. Chaining 5 and one DC in the 3 DC and continuing this all the way round. A blue border was intended to be added but I waited to see if it was a boy or girl. As you can see it was unnecessary as she had a beautiful little girl.

Ruqayyah
This image was taken at the hospital the day she was born. Here she is squeezing her tiny little eyes tight because of the flash on the camera.. bless xx

Tuesday, April 12, 2011

Hoopla Yarn.


I wanted to share this new yarn that I have sampled.
It's from a site called Hooplayarn.com. The yarn is stretchy and flexible and a Jersey like material. After much deliberation I decided to crochet a hot water bottle cover with the large spools of yarn. I have used a 9.00 mm crochet hook. The spools come in 500g, about 100 metres long and are 100% cotton.

Here is the pattern if you wish to make a cover your self.

Hot water bottle cover pattern.

Abbreviations. CH= chain, DC Double Crochet(uk) = SC in USA & International. SS= Slip Stitch. WS= Whip Stitch

A. CH 17. DC 11 rows, SS and cut yarn. You should now have a square.

B. At the base of the square you have just crocheted join your yarn to the first CH and DC along the bottom to the end of the first row, turn and continue to DC 8 rows. SS and cast off.

C.WS both sides . This will form the main body of the hot water bottle cover. It should resemble a pocket with 3 rows left above. One panel should be longer than the other.

D. SS your yarn in the fourth row from the top of the longer panel. DC 3 rows but, every row you do SS both panels when you reach the edge turn and do the same when you reach the other end. ( You will potentially be joining as you DC) . This process will be creating the pocket for the bottle to be inserted in to.

E. When you get to the top of row 11 join 4 DC with the other panel across the top (use the WS or SS). You will need to leave a gap in the middle which forms the neck of the cover. Leave 6 DC and then join four DC on the other end (join 4 DC left and 4 DC right, 6 DC gap in middle) . SS and cut yarn.

F.* Join in the corner of gap in the middle( the 6 DC gap, this is the neck of the cover. ) DC 1 row.

G. DC 2nd row and increase twice (every other stitch, three stitches in total)

H. DC 3rd row, increase once DC next 2 stitches and increase in the next stitch.

I. Last and final top row. DC across. No increases.

J. Repeat from * on the other side.

K. WS or SS both panels on each side.

L. Now turn your work inside out. This is the correct side and all joining will be hidden.

Now for the fun part.. Jazzing up your cover !

You can now add either fancy ribbons to fasten the opening to the cover or sew on buttons, use velcro or even attach a zip.

The front of your hot water bottle cover is pretty much a blank canvas and you can decorate this any way you please! Some examples... crochet flowers, embroidered patch, felt shapes, buttons, or you can just leave it plain. One tip though : Try not to sew any hard or bulky items on to the cover this is because they may dig in when you begin to use it. Worst thing when taking a hot water bottle to bed is waking up in the morning with an imprint of a big button on your face

Ribbon ties for access
Front of bottle laced like shoe laces !
Close up view of stitches
I hope you like this cover. It has taken me a while to finally finish it and decide on how to decorate it. The pattern is totally my own so if you use it please tell me if there are any errors. I have tried my best to keep it simple. 
This cover will be posted off tomorrow morning to Hooplayarn as they have supplied me with this yarn to sample. Thank you Hooplayarn.
I'm going to sleep now as I am cream crackered- knackered and have an 8.30am start at work later.
Happy crocheting people. Night, night. Yawn !

Monday, April 4, 2011

Solid Granny Square Blanket

Hello everyone, It has been a while and I apologise for not having blogged sooner. I wanted to share this blanket that I completed last year in September 2010. This is my first large crochet project. 
I had a lot of spare wool that I hadn't used and decided to make a blanket to use up all the excess. I started browsing online for ideas and tutorials and came across this tutorial by Crochet Mania Theresa . Her video tutorials that have been posted on YouTube. They are very useful and helped me to get to grips with learning certain crochet techniques. (A huge thank you to Theresa). 
I worked a solid granny (as listed in her tutorial) Solid Granny Motif .

I continued to work the granny square by changing colour and working three rounds of double crochet . I used a crochet hook size 3.5mm (UK). I continued working the granny square by working three rounds in each colour I had. The wool is all Dk Bonus wool that was ordered from Peachey Ethnits .
The blanket formed a perfect square. It looked fine as it was but I wanted a rectangle blanket, some thing to throw over my bed or throw over a sofa. I decided to continue the colour stripes width ways at each end of the blanket. I worked three rows of each colour to match what I had already crocheted. 
                                 The blanket has been laid on my single bed.
I used a total of 13 colours. The border was blanket stitched in black wool.

It is amazing to see this now and see how far I have come. I see errors in this blanket that I never saw before but I love it all the same and that's what makes it so special to me. I reflect on my early work and like the simplicity and effectiveness of this blanket. It looks far more complicated than it actually was to make. All that is required is time and determination to keep going (especially when it starts to get larger and each round takes that much longer to do).

Yup. This is 'My Tiny Box Room'.

Here it is on show in my very neutrally coloured room. I reckon the colours POP ! and SPLASH ! and it brings my room to life.


Here is a sneaky peak of a project underway...
Afrikaan Flower.

Thursday, March 3, 2011

It's competition time !

Forbidden Planet has just launched a new competition and it is all about crafting (which is close to my heart). I have been very lucky to have the Batman that I crocheted used as part of the promotion banner . My inspirational and hard working crochet buddy Penny Ruddell has had her crochet whale used to promote crafting on Forbidden Planet's website and in all the Forbidden Planet stores. I highly recommend her work. Here is her blog Crochet Cravings . I think our work looks great together.

Here is your chance to enter the competition. It's a wonderful way to show case your work and there are some lovely books to be won. You don't have to stick to Amigurumi or Crocheting you can make what ever you like !

Visit Forbidden Planet Face Book post your comment's and see your entries posted up. I wish you all the best of luck !


Wednesday, March 2, 2011

The Dark Knight

Hi all, I wanted to share this guy with you. He is probably one of my favourite comic book characters. He is none other than the 'Caped crusader', the 'Dark knight', the sultry, moody, man of very few words, 'Batman'.
I made this Ami for a little guy called Isaac. This was his back up Christmas gift last year when the snow had held up everyone's deliveries. Batman took me roughly 7 hours to do in total. I made him over a few days. The most difficult part for me was his hair. I wanted him to be Bruce Wayne when the cowl was removed and wanted his hair to be neat and slicked back. (That was a challenge let me tell you !) On the first head I attempted the hair looked awful ! Bruce looked like a monk ! ha ! (see below)


First head attempt


I was discussing with my friends at work the colour of Batman's eyes. In the film's he is mostly portrayed with brown eyes and dark hair. Batman's statistic say that he has black hair and blue eyes. Batman's Statistics. ...So in went some bright baby blue safety eyes. I used DK wool in mid grey, black, flesh tone and sunflower yellow. The mouth was embroidered with tapestry thread. Batman's logo was cut out of some black felt material.


I really hope you all like the 'Dark Knight'. If I had more time I would have liked to have crafted him some batarangs ! By the way the little boy, Isaac loved his new toy.


Monday, February 21, 2011

Amigurumi Kitten

Hey there. Hope your all keeping well. Thank's for visiting my blog . Just want to share this crochet 'Ami' (Amigurumi) kitten.
I started this project using the kitten pattern in a book by Brigitte Read called 'Super Super cute crochet'. ( I have listed this book in 'Books I recommend' See below). I used this expensive 'Alpaca wool in shade 'Storm'.
http://www.laughinghens.com/knitting-wool-yarn.asp?yarnid=1288 It started off ok and then it turned in to what I can only describe as a grey mess....an expensive grey mess. I spent a couple of hours trying to get the head right. I got so fed up of this project I stuffed it in a bag tried to forget about it.
After about a week I revisited the sad, big headed, grey mess and took pity on it. I assessed where I had left it and decided to stuff it with poly fibre fill to see what it looked like. It didn't look too bad. I unstuffed the kitten's head, added the biggest safety eyes I had. I wanted to give the kitten green eyes but didn't have any green eyes big enough. The nose was embroidered using normal black Dk wool. I sewed the paws and tail on after rolling poly fibre fill around pipe cleaners. ( Pipe cleaners in the limbs help when you wish to pose your ami project).
The detail of the whiskers and pads on the feet were added on last.


I think it turned out pretty cute and my perseverance paid off.... eventually. :D !

Monday, February 14, 2011

Flap Jacks !

I burst in to the house tonight with plans... Shopping and plans. I had the sudden urge to make flap jacks. Yay ! Not the most exciting thing in the world but when I get an impulse I can't seem to shake it until it is done. After putting a new collar on our family cat 'Dashly' ( whom you will all become well acquainted with over the next few weeks... he he ) and eating my supper of lamb and potatoes I got to work.

Pre-heat the oven to gas mark 6

Ingredients
125g Butter or 4oz
10 oz oats
Honey (good glug of it !)
Maple Syrup 3 table spoons
Golden Syrup 2 table spoons
Dried Cranberries about 3 quarters of the bag
Ground nuts. 1 desert spoon.

Method
Place the butter in a saucepan and melt slowly. Add in the honey, golden and maple syrup and stir the mixture. Next, add in the dry ingredients of oats , cranberries and ground nuts, stir thoroughly. Keep stirring for about 10 minutes until the mixture is thoroughly heated through or when you can start to smell the yummy goodness.
Next place in a baking tray lined with grease proof paper or place cup cases in a cup cake tin and spoon in the mixture. A good heaped desert spoon in each case or flatten out the mixture evenly in the lined tin. Place in the pre heated oven and bake for 20 minutes. You can cut the flap jacks in to squares if you have chosen to make it in a tray. Allow to cool through for about 15-20 mins. They are now ready to devour !

Gorgeously delicious with a lovely cup of tea or coffee. So quick an easy to make in about half an hour.You can try to add different dried fruits or nuts or no fruit at all, if you want to go all out chuck in some chocolate chips.


If there are any left tomorrow some lucky work colleagues will be sampling these very tasty treats.
Give it a shot and let me know what you think. 

Wednesday, February 2, 2011

My very first Amigurumi.


Here is my very, very first 'Amigurumi' 編みぐるみ, literally "Knitted stuffed toy".
After making crochet hats for what seemed like months I applied the circle I had been repeating in to a 3d Sculpt and went for a fun pink iced donut. Hmmmm.....yummy. I was very pleased with the success of my first 'Ami' project..and I used no patterns !